You are here
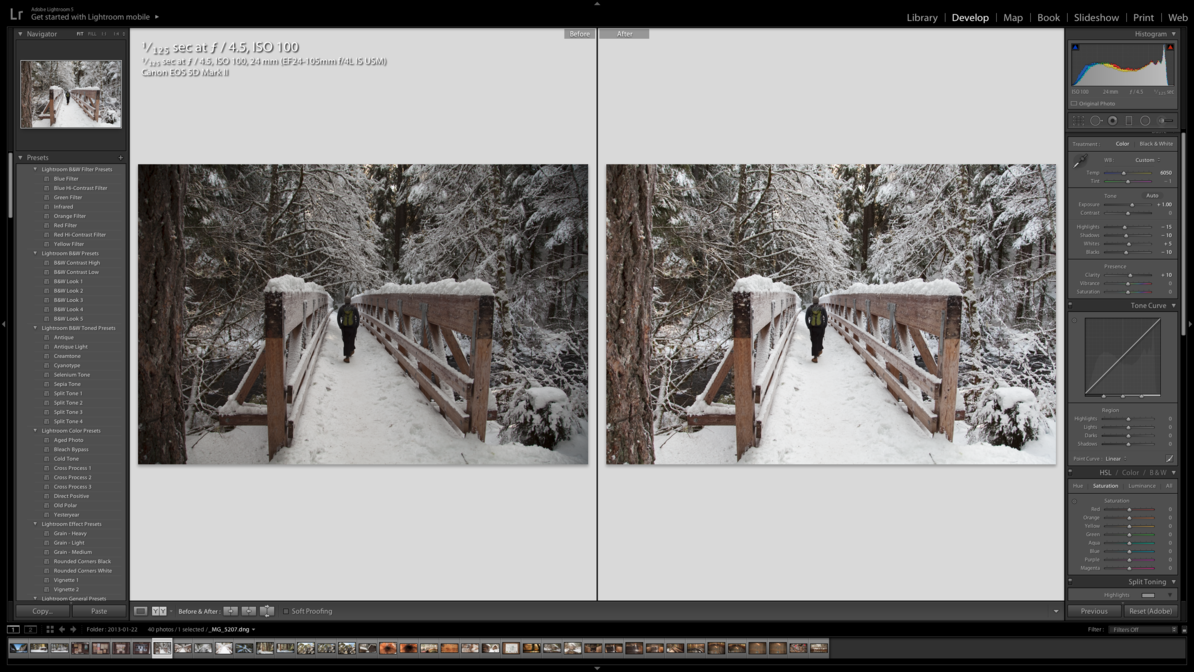
So there you were out on a beautiful winter day snowshoeing through the woods. A storm moved through overnight and left the most pristine blanket of billowing snow on each branch. You stopped to enjoy the silence as the snow absorbed the sounds of the forest, and you pulled out your camera to grab a shot of your tracks stringing out behind you on the trail's narrow corridor. Later, you checked the images out on your computer only to see that you failed to record the feeling of that moment somehow. The purity of the snow didn't translate, and instead the day appears dreary and drained of the excitement and wonder that led you to bring your camera in the first place.
What happened? Your camera played it safe, and you have to compensate for this either in the field or in post production. This happens in plenty of situations, but especially with snow. Here's why.
Playing it safe
Digital cameras are programmed to return the widest range of results from a variety of lighting situations, everything from dark darks to light lights. But data that is beyond the highest end of the camera's spectrum, the brights that are too bright, simply gets lost to the sensor. It literally shows up as blank. Camera's don't like this situation; it bruises their delicate egos and makes them feel inadequate. So they avoid the potential embarrassment by trying to meter light tones down a bit to a safer zone; hence bright whites may appear closer to a light gray or even a dark gray, which is an acceptable casualty of the scene when it means more highlights remain within the camera's reach to represent.
Warning: Depending on your experience, things may start to sound technical here, but please persevere...all will become clear.
This intentional underexposure is especially common when you shoot in automatic modes such as full auto, program, aperture or shutter priority, when camera makes all the decisions about what a proper exposure looks like. The camera controls the situation, and it will aim to contain as many highlights as it can by shifting the entire lighting spectrum down into something it can represent. Mind you, this can work effectively in many situations, until sometimes, as with snow, it doesn't.
It happens in manual mode, too

But a similar process unfolds when shooting in manual modes in anything other than a spot metering mode. This refers to how much of a scene the camera uses to provide light metering (exposure) information. If you imagine that a grid is superimposed on a scene, different metering modes will use different numbers of squares from the imagined grid to tell the camera about the overall exposure of the image: Zone or weighted average metering modes take information from several squares on the grid, or maybe all the squares on the grid, and averages that information together for an exposure setting. But you have to remember that the camera's equations will have that same aversion to excessively bright data at their root. Think of zone metering as an auto mode that is based on the same mandate to avoid losing data at the bright end of the spectrum. If you shoot in manual but you are using a zone metering mode, the camera crunches the exposure data to stay on the safe side, and you'll likely end up with an underexposed snow shot all the same.
Solutions in the field
To fix this situation in the field and to save you some time in front of the computer at home, a few small adjustments will help. If you are shooting in an auto mode (no shame in that, by the way...they can be very useful tools), keep your metering in average or weighted average, find out where your exposure compensation adjustment is (Google it if you have to), and bump it up by a half to a full stop. Experiment. You want to see some detail, shape, and texture in your snow, so if a full stop is too bright, dial the exposure compensation back by a third and try again. You're essentially holding the camera's hand here, so be patient and gentle; you're walking it outside of its comfort zone.
If you're shooting in manual, make sure you're in a spot metering mode. This way you've removed the camera's ability to feed extraneous data into exposure information. You want to know how much light is bouncing off of the snow at one particular spot. Then, adjust your exposure until that particular snowy spot meters between a half and a full stop above the center mark of your camera's light meter (that center mark represents gray). Again, experiment, be patient, be gentle. Gradually you'll learn where your meter needs to read when you're shooting snow in manual, and it will be come reflex.
Solutions at home

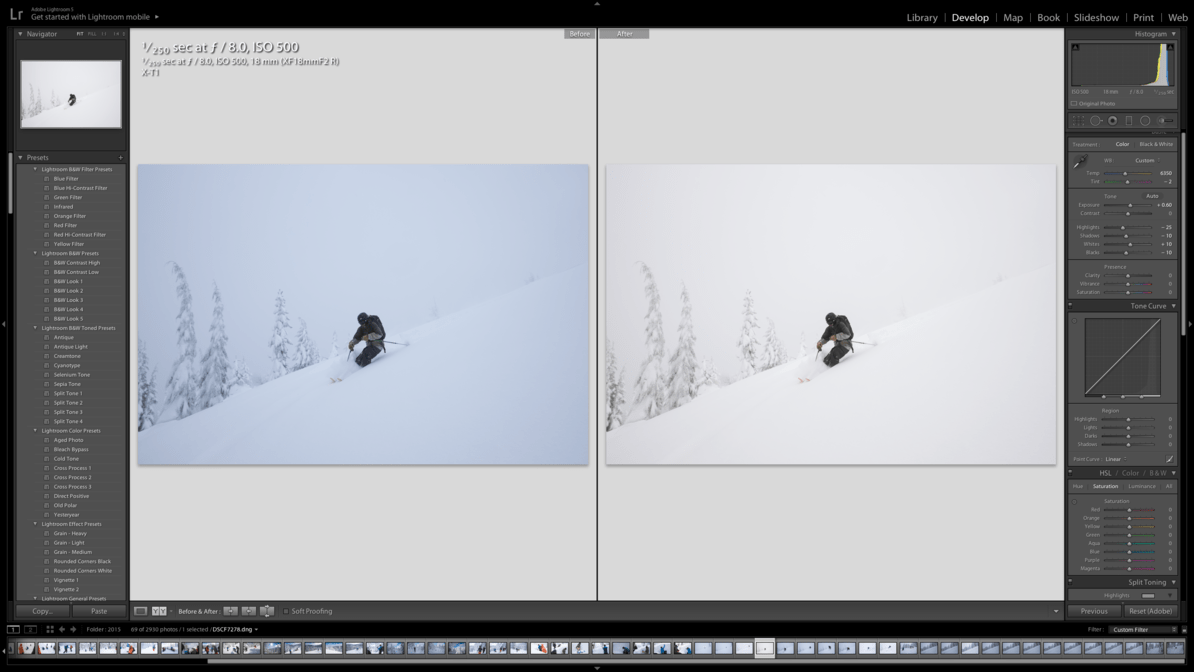
Several things can happen in the field to conspire against a proper exposure, and that's when the camera's safe instincts really become an asset. Whether you were shooting fast and didn't have time to dial in a proper meter reading or you couldn't access the exposure compensation, the camera captured the scene doing what comes naturally to it, so things may appear darker than they need to be, but at least the information is recorded. Thankfully, the most basic and most essential adjustment in any editing software is an exposure adjustment, and all you need to do is bump this up by a half to a full stop until your snow looks white but you still have texture, shape, and detail. Bringing highlights down can help and allows you to add more exposure to the scene overall. You may also benefit from making some contrast adjustments by bringing blacks and shadows down SLIGHTLY.
Don't forget temperature
While you're there in front of your computer, you'll also want to make sure your white balance is accurate. This is your camera's effort to read the color of the ambient light, whether shady, cloudy, or sunny, and this is another of the camera's Achilles heels. Understand that the human eye rarely perceives snow as blue. For us, pristine snow is normally white because our eyes are absolutely amazing and can adjust to different lighting situations. Even in the shade. Even under clouds. Even in the light of dusk and dawn. If there is some shading to the snow because of natural light, it is usually slight. Cameras will frequently get this wrong and allow the white balance to slip to the cool, or blueish, side, especially in shade or under clouds. You may need to warm up your images by moving the white balance slider to the right into higher temperatures. Don't overdo it! Yellow snow looks just as conspicuous as blue snow. Remember, you're looking for white.
There are plenty of applications for these techniques beyond snow, of course. Any scene that shows white can benefit from a little more direction from the photographer, whether it is a snowy forest scene or a gushing waterfall or a whitewashed row of houses on your favorite Greek island. White whites will improve the overall contrast of your scene and add a ton of character to the final image. If you're lucky, you may even find that you captured the scene as you remembered it.


Comments
Sign In and share them.